
Table of Contents
- How Voltage Choice Impacts Mini Split Performance
- Mini Split Voltage Fundamentals: Understanding 110V and 220V Power
- Is It Better to Run a Mini Split on 110 or 220? A Technical Deep Dive
- Practical Efficiency Tips: Getting the Most from Your Mini Split
- Advanced Multi-Zone Electrical Configurations and Upgrades
- Mini Split Voltage FAQ: Common Homeowner Questions Answered
- Your Mini Split Power Choice: Expert Installation and Support
How Voltage Choice Impacts Mini Split Performance
Deciding if it is better to run a mini split on 110 or 220 volts comes down to your home’s electrical panel capacity and the size of the unit—not cooling performance. Both voltages deliver equivalent heating and cooling because a mini split’s capacity is determined by its compressor and refrigerant circuit, not by supply voltage. The choice primarily affects how much electrical current the system draws and the wiring requirements for safe operation.
A 220V mini split draws about half the amperage of a similar 110V model, allowing installers to use lighter gauge wiring. However, a double-pole breaker must be used that uses up two slots on the electrical box. If you have limited space available in the box, this could be a deciding factor. Larger capacity models (approximately 24,000 BTUs or greater) are more often offered in 220v configurations because their current draw can exceed what a normal residential 120v circuit can support.
No matter what voltage you’re using on a ductless mini-split system, there must be a dedicated circuit, and the National Electrical Code requires a disconnect switch within sight of the outdoor unit. WireRef says that NM-B cables can only be used inside; if you want to route wires all the way up to the condenser, they need to be encased in conduit with THHN conductors. Making sense of this difference between AC 110V systems and AC 220V systems is the first step towards making sure you install things correctly at home.
Key Takeaways
- Voltage on your mini-split is either 110V or 220V at home.
- The decision between 110V and 220V for a mini split is about electrical infrastructure, not cooling output.
- It takes much more to make your mini-split system as efficient as possible than just having the right volts.
- The right electrical installation is necessary to take full benefit from multi-zone ductless systems’ potential energy savings.
- Deciding whether your ductless mini-split will run on 110V or 220V electricity isn’t about how well it will perform as a cooling system.
Mini Split Voltage Fundamentals: Understanding 110V and 220V Power
Voltage on your mini-split is either 110V or 220V at home. This indicates how much current the system will draw from your panel, not its cooling capability or energy efficiency. So many homeowners think high voltage means better cooling, which isn’t true because the fundamental principle behind voltage is more of an infrastructure issue than output issue. Voltage can be defined as electric force pushing the current through the circuit. Amperage is the amount of current flowing in a given direction. Wattage is the total amount of power consumed, figured out by multiplying voltage times amperage. Understanding these definitions makes sense of why mini-split works on 110V versus 220V.
According to FixItInTheHome.com, a 12,000 BTU mini split operating on 110V typically draws about 10 to 12 amps, while the same capacity unit on 220V draws only 5 to 6 amps. This halving of current for the same power output is because power (watts) is the product of voltage and current. So a 220V unit can deliver identical heating or cooling capacity while using less electrical flow, which allows for thinner wiring in many installations. Importantly, the nominal cooling BTU rating is determined by the system’s compressor, refrigerant circuit, and design—not the supply voltage. A properly sized 110V mini split cools a room just as effectively as a 220V model of the same capacity.
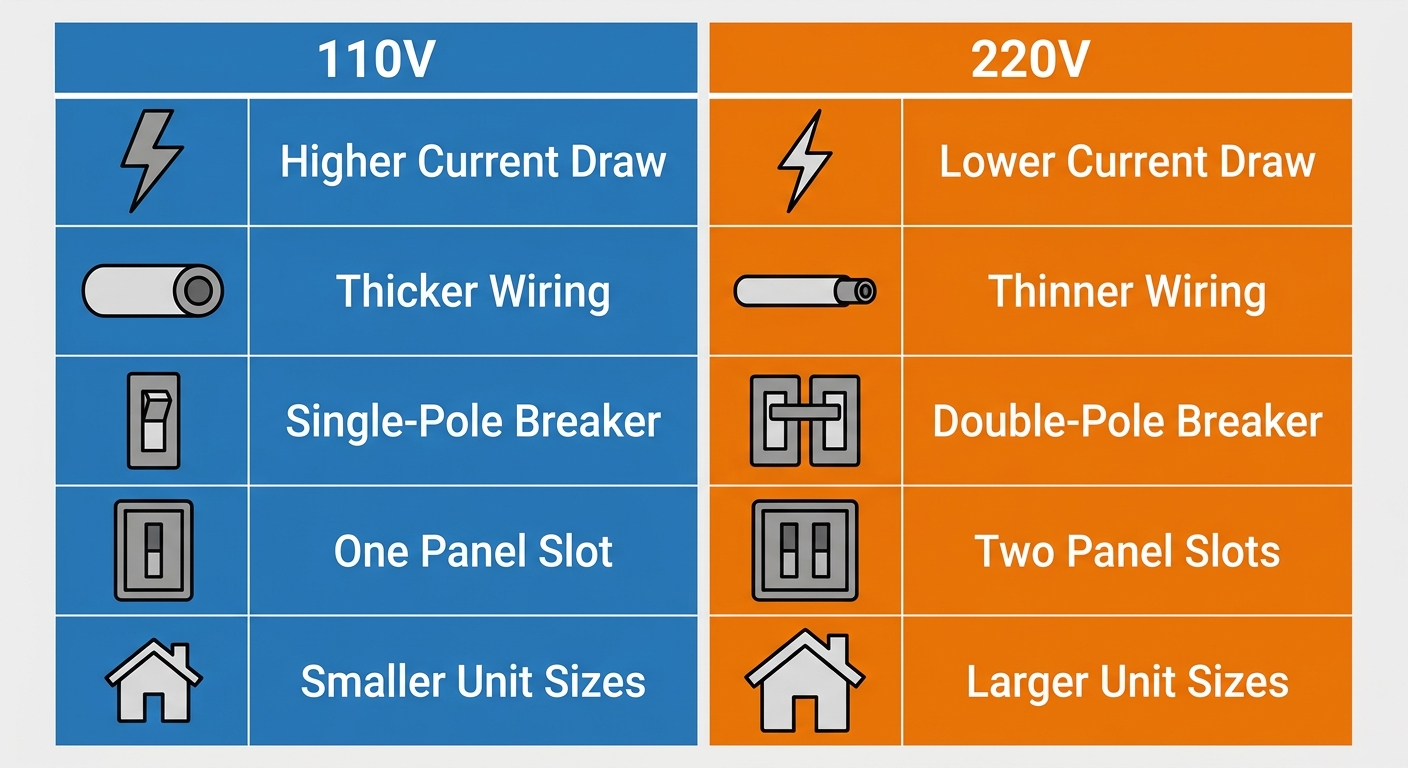
When you look at the actual wiring, there is some difference between running 220V versus 110V wiring. A 220V circuit will need a double-pole breaker that takes up two spots in your breaker box while a single pole breaker will handle the smaller 110V loads. Regardless of whether it’s 220V or 110V, all ductless mini-splits must be placed on their own circuit per the National Electrical Code. The NEC says that in addition, there needs to be an accessible disconnect within sight of the outdoor condenser (NEC 440.14). So when you wire your ductless mini-split system, you cannot just use standard NM-B cable (or romex) out to the condenser. Instead, the code calls for running THHN wires inside conduit. Studio City homeowners need to know that when wiring exceeds a certain distance, voltage can drop. For instance, a run of 14AWG copper wire at 25ft shows only slight drops, 0.5%, compared to 3.7% when the length reaches 200 ft. To maintain efficiency, the recommended maximum voltage drop for branch circuits is 3%, which may necessitate a thicker wire gauge for longer runs. If a lengthy wire run is unavoidable, you may need to use a thicker-gauge wire to keep the voltage drop at or below 3%.
Looking at this from another perspective, we can examine the technical and practical factors that guide whether 110V or 220V is the better choice for a particular Studio City home installation.
Is It Better to Run a Mini Split on 110 or 220? A Technical Deep Dive
The decision between 110V and 220V for a mini split is about electrical infrastructure, not cooling output. A 110V (120V) unit can match the BTU capacity of a 220V (240V) model because performance depends on compressor and design, not supply voltage. The real differences are in amperage, wiring, breakers, and code requirements—factors that directly affect installation cost and safety.
Knowing what the tradeoffs are will help you pick the proper voltage for your house.
Current Draw and Wire Sizing: 110V vs 220V
Current draw is the primary technical difference between 110V and 220V mini splits. Because wattage equals volts times amps, a 240V unit draws roughly half the amperage of a 120V system for the same output. A 12,000 BTU model on 120V pulls 10–12 amps, while on 240V it draws only 5–6 amps. That lower current allows thinner, less expensive wiring: many 240V mini splits up to 12,000 BTU use 14 AWG copper, while 120V units may need 12 AWG. Reduced amperage also minimizes voltage drop over long runs, letting an outdoor unit be placed farther from the panel—for example, up to 114 feet with 14 AWG copper at 3 percent drop. When sizing conductors, always follow the nameplate MCA rather than assumptions.
Breaker Requirements and Panel Capacity
110V mini splits require a single-pole breaker, while 220V systems need a double-pole breaker that consumes two panel slots. This constraint can be critical if your electrical panel is near capacity. Typical 240V breaker sizes are 15 amps for 9,000–12,000 BTU units, 20–25 amps for larger units, and 30 amps for multi-zone systems, all matching the equipment’s MOCP rating. A licensed electrician can perform a load calculation to confirm your panel has enough amperage headroom; if not, a subpanel or service upgrade may be needed. Additionally, many larger mini splits are only available in 240V because their current draw exceeds safe limits for 120V circuits. Planning ahead for panel capacity avoids delays and costly revisions.
Code Compliance and Safety Considerations
NEC requirements protect both equipment and occupants. Key rules include:
- A dedicated circuit—no other loads on the branch.
- An outdoor disconnect within sight of the condenser per NEC 440.14.
- NM-B cable limited to indoor, protected spaces; outdoor wiring must use THHN in conduit.
- While GFCI is not universally required, local amendments may mandate it, so verify local codes.
WireRef.com notes that these national standards are a baseline; local building departments can impose stricter rules. We always recommend involving a licensed electrician, as improper wiring risks overheating, fire, and voided warranties. Even if a 120V circuit appears adequate, verifying proper wire gauge and dedicated status is essential.
Installation Costs and Practical Implications
A 220V circuit requires more labor and a double-pole breaker, which increases installation costs. An adjacent 110V outlet will work for small-BTU mini splits, but larger models over 12,000 BTUs may need 220V; the thinner wire can lower wiring costs. Selecting the 220V route now allows you to plan ahead in case you want to expand your mini-split setup later down the road. We offer mini split wiring and coordinate with licensed electricians to ensure safety and code compliance. After deciding on 110V or 220V, discuss maximizing mini-split efficiency by choosing the right size and scheduling regular cleaning.
Practical Efficiency Tips: Getting the Most from Your Mini Split
It takes much more to make your mini-split system as efficient as possible than just having the right volts. You’ll need the right temperature settings, routine maintenance, and sometimes electrical upgrades.
Optimal Set Points and Use Patterns for Efficiency
Adjusting the temperature settings on your thermostat can be one of the easiest methods for saving power usage. If you’re going to be out of the house in the summertime, bump up the set-point a little bit while you’re away to reduce compressor run time without sacrificing comfort when you return. Also many models have a fan only feature that moves around air in your home without the compressor starting. This is good if you want some airflow through your mini-split unit, but don’t need to cool off the entire home at once.
Using Inverter technology can be extremely beneficial when trying to save energy. Traditional systems turn either completely on and off, but using an inverter compressor allows you to adjust the speed as needed to keep a consistent indoor temperature. In addition, take full advantage of any available zoning capability within your home so you don’t heat or cool spaces that aren’t being used.
Estimating Monthly Running Costs: 110V vs 220V
The question many homeowners ask themselves when deciding between running their mini-split AC on either 110V or 220V has less to do with its inherent energy consumption and more about electrical design. Both voltage types will produce the same amount of cooling or heating based on the BTU rating, meaning there shouldn’t be too big of a variance in terms of month-to-month costs. To figure out what it would take to run a mini-split AC, though, you’ll need to know the unit’s wattage as stated in the specifications as well as your local electricity rates expressed per kWh.
One aspect of using 220v may be its small edge due to lower wiring loss. According to FixItInTheHome, a 12,000 BTU unit takes around 10-12 amps at 120V and reduces this figure to between 5-6 amps when run off 240V. As resistive losses in wires are proportional to the square of the current, halving the current can significantly cut wasted energy in long cable runs.
When to Consider Upgrading Your Electrical Setup
While 110V mini splits work well for smaller rooms and single-zone setups, certain scenarios warrant upgrading to a 220V circuit. If you plan to install a larger unit—say 18,000 BTU or above—you may find that models in that capacity are predominantly available in 220V configurations. A 220V circuit requires a double-pole breaker and two available slots in your electrical panel.
Expanding a multi-zone system or installing many heads in a single location will often push the electrical demand beyond what a standard 120v branch circuit can safely supply. Upgrading may also be prudent if your home has older wire runs or if the dedicated circuit for the mini-split must run a long distance from the panel; the lower current of 220v reduces voltage drop and resistive heating, improving overall safety and efficiency.
Maintenance Practices That Boost Efficiency
Even the most advanced system loses performance in time without regular upkeep. Here are some easy ways to make sure your mini-split stays efficient.
- Clean or replace air filters every month during heavy-use seasons to maintain proper airflow.
- Inspect indoor and outdoor coils annually for dirt or ice buildup that inhibits heat exchange.
- Keep the area around the outdoor unit clear of leaves, debris, and plants—a clearance of at least two feet is typical.
- Schedule professional maintenance once a year to check refrigerant levels, electrical connections, and overall system health.
Now that you’ve optimized a single unit’s efficiency, expanding to a multi-zone application can deliver whole-home comfort. This step often requires a 220V electrical upgrade, making the earlier considerations about voltage and panel capacity all the more relevant.
Advanced Multi-Zone Electrical Configurations and Upgrades
The right electrical installation is necessary to take full benefit from multi-zone ductless systems’ potential energy savings. A correctly-sized system might perform poorly or pose a safety risk if its dedicated circuits, disconnect placement, and conductor types do not match the equipment’s nameplate values.
Several fundamental requirements define a safe, long-lasting multi-zone electrical setup:
- Each outdoor condenser must have a dedicated branch circuit sized to the manufacturer’s Minimum Circuit Ampacity (MCA) and protected by a breaker no larger than the Maximum Overcurrent Protective Device (MOCP) — never sized by tonnage alone.
- A lockable disconnect switch must be within sight of the outdoor unit and readily accessible, as required by NEC Article 440.14.
- Use NM-B cable for interior runs inside walls or attics; for exterior or exposed locations use individual THHN conductors inside appropriately sized conduit.
- Route communication cables between indoor heads and the outdoor unit separately from power wiring to prevent electromagnetic interference.
- Size branch circuit conductors to limit voltage drop to 3% or less at full load; longer runs often require heavier gauge wire than the minimum ampacity.
MCA and MOCP Override Generic Tables: The nameplate specifies the minimum conductor ampacity that must be used in order to avoid over heating due to continuous loading, whereas the MOCP is the maximum size breaker that can protect the equipment without overloading. When installing equipment, we check the nameplates on both the outside units as well as the existing panel.
This amount should not go over the outdoor unit’s MCA/MOCP. Otherwise, options include using a bigger unit or providing a second dedicated circuit. Most houses don’t have enough electrical space or amps available to fit another pair breaker, and we recommend a licensed electrician evaluate the panel before completing their multi zone design work. If there isn’t enough room, they might suggest putting up a sub-panel or increasing service size.
Selecting between 110V and 220V matters for configuration and efficiency. You can count on us to provide you with a system and solution that fits your family’s unique needs, grounded in NEC compliance and experienced electrical and HVAC work.
Mini Split Voltage FAQ: Common Homeowner Questions Answered
Deciding whether your ductless mini-split will run on 110V or 220V electricity isn’t about how well it will perform as a cooling system.
Does voltage affect cooling performance?
No, voltage does not determine cooling output; the compressor and refrigerant circuit do.
Do I need a dedicated circuit?
Yes, every ductless mini-split should be on its own dedicated circuit.
What breaker does a 220V mini-split require?
A 220V unit needs a double-pole breaker that occupies two slots in the electrical panel. Larger-capacity mini-splits are commonly only available in 220V configurations.
What about the outdoor disconnect and wiring?
The NEC requires a disconnect switch within sight of the outdoor unit. NM-B (Romex) cable is only approved for interior use; outdoor wiring must use THHN conductors inside conduit.
If you would like to install this professionally, please call us up and we will be happy to help with your electricity needs.
Your Mini Split Power Choice: Expert Installation and Support
Whether you’re running a mini-split on 110V or 220V depends on how much power your panel can handle, not on whether it will cool or heat better. The voltage does not affect that. A 220V circuit requires a double-pole breaker, taking up two slots instead of a single-pole 110V breaker. Each unit has its own dedicated circuit, a disconnect switch near the outdoor unit, and requires NM-B cable indoors. We’ll ensure all work is performed to code. Please feel free to contact the Studio City AC Repair Experts at (818) 643-3794 or visit 12196 Ventura Blvd, Studio City, California 91604.
Get Expert Mini Split Installation
Now that you understand the 110V versus 220V decision is about electrical requirements rather than cooling performance, you can make an informed choice for your home. Proper installation following NEC standards is essential—that includes a dedicated circuit, an outdoor disconnect within sight, and using the correct wiring indoors and out. Our family-owned team brings over 15 years of experience to every mini-split installation in Studio City, California. We handle everything from electrical panel evaluation to final system setup, ensuring your unit runs safely and efficiently. Whether you need a single-zone 110V unit or a larger 220V multi-zone system, we can guide you through the options and manage the entire installation. Contact Studio City AC Repair Experts at (818) 643-3794 or visit our location at 12196 Ventura Blvd, Studio City, CA 91604 to schedule an appointment. Your comfort and peace of mind start with a professional installation tailored to your home’s electrical capacity.
Get Expert Mini Split Installation